> ## Documentation Index
> Fetch the complete documentation index at: https://docs.novita.ai/llms.txt
> Use this file to discover all available pages before exploring further.
# Novita OpenClaw CLI
Deploy a persistent OpenClaw agent on [Novita Agent Sandbox](https://novita.ai/sandbox) with one command, then manage it from CLI, Web UI, or automation scripts. No session cap — your instance runs 24/7 for as long as you need it.
## What's New
The latest release adds Telegram and Slack as messaging channels with CLI-based configuration, and improves install reliability:
* **Telegram Channel (CLI)** — Polling and Webhook modes for connecting your agent to Telegram
* **Slack Channel** — Socket and HTTP modes for connecting your agent to Slack
* **Install Script Improvements** — Install directory changed to `~/.novitaclaw-cli`, improved `update` command with PEP 668 support and symlink recovery
### Previous Release
* **Web Terminal** — Browser-based terminal access to your sandbox, no SSH required
* **File Manager** — Browse and manage workspace files directly from the browser
* **systemd Service Management** — Gateway, Web Terminal, and File Manager are fully managed by systemd with automatic restart on failure, replacing the previous nohup-based background processes
* **Crash Auto-Recovery** — When the Gateway crashes repeatedly, it automatically runs diagnostics, repairs configuration, and restores service without manual intervention
* **Config Auto-Backup** — Every config write creates an automatic backup; crash recovery can restore from the latest known-good backup
If you have a previous version installed, upgrade to get these features:
```bash Bash icon="terminal" theme={"system"}
pip3 install novitaclaw --upgrade
```
If the upgrade fails, try a force reinstall:
```bash Bash icon="terminal" theme={"system"}
pip3 install novitaclaw --upgrade --force-reinstall
```
## Getting Started
### Prerequisites
* Python installed
* A Novita API key (create/manage keys in [Key Management](https://novita.ai/docs/guides/quickstart#2-manage-api-key))
**Windows**
[Download the Python installer](https://www.python.org/downloads/) and run it. **Check "Add Python to PATH"** before clicking Install Now — skipping this is the most common reason beginners hit errors later.
**macOS**
Open Terminal and run:
```bash Bash icon="terminal" theme={"system"}
python3 --version
```
If you see Python 3.10 or higher, you're good. If Terminal prompts you to install Command Line Developer Tools, click Install and wait a few minutes.
**Linux (Ubuntu / Debian)**
```bash Bash icon="terminal" theme={"system"}
sudo apt update && sudo apt install python3 python3-pip -y
```
### Step 1: Install NovitaClaw
```bash macOS / Linux theme={"system"}
sudo pip3 install novitaclaw
```
```bash Windows PowerShell theme={"system"}
pip install novitaclaw
```
After installation, verify by running `novitaclaw --help`. If you see a list of commands, you're all set.
**Mac users:** If you get `zsh: command not found: novitaclaw` after installation, run:
```bash Bash icon="terminal" theme={"system"}
echo 'export PATH="'$(python3 -m site --user-base)'/bin:$PATH"' >> ~/.zshrc
source ~/.zshrc
```
### Step 2: Set your API key
```bash macOS / Linux theme={"system"}
export NOVITA_API_KEY=sk_your_api_key
```
```powershell Windows PowerShell theme={"system"}
$env:NOVITA_API_KEY = "sk_your_api_key"
```
### Step 3: Launch your instance
```bash Bash icon="terminal" theme={"system"}
novitaclaw launch
```
On success, the CLI returns:
* **Web UI URL** — Chat with your agent
* **Gateway WebSocket URL & Token** — For programmatic access
* **Web Terminal URL** — Terminal access to the sandbox in your browser
* **File Manager URL** — Browse and manage workspace files
* **Login credentials** — Username and password for Web Terminal & File Manager
 Open the returned **Web UI URL** and go to the `Chat` tab to start using your agent.
### Web Terminal
The Web Terminal provides browser-based terminal access to your sandbox environment. Open the **Web Terminal URL** returned by the launch command and log in with the provided credentials. This gives you a full shell session — install packages, inspect logs, or debug your agent directly.
### File Manager
The File Manager lets you browse, upload, download, and manage files in the sandbox workspace through a web interface. Open the **File Manager URL** and log in with the same credentials. Use it to view agent workspace files, edit configurations, or transfer files without needing CLI access.
For existing sandboxes launched before these services were available, you can add them retroactively:
```bash Bash icon="terminal" theme={"system"}
novitaclaw services setup --api-key YOUR_API_KEY
```
## Configuring Models
Your instance is pre-configured with a Novita-hosted model out of the box. To change the models your agent uses, navigate to `Settings → Config`, click **Raw** to switch to Raw JSON5 view, then click the reveal button next to "secrets redacted" to show the full config.
Update the following two sections:
### Step 1: Register the model under your provider
Add a new object to the `models` array inside `models.providers.novita`:
```json theme={"system"}
{
"models": {
"providers": {
"novita": {
"models": [
{
"id": "model-id",
"name": "display name",
"reasoning": true,
"input": ["text"],
"contextWindow": 200000,
"maxTokens": 50000
}
]
}
}
}
}
```
### Step 2: Set it as primary or fallback
Update the `model` field under `agents.defaults` to reference your model using the `provider/model-id` format:
```json theme={"system"}
{
"agents": {
"defaults": {
"model": {
"primary": "novita/model-id",
"fallbacks": ["novita/fallback-model-id"]
}
}
}
}
```
Click **Update** to save. Every LLM available on the [Novita platform](https://novita.ai/model-api/product/llm-api) is supported. Third-party providers can also be configured — when you bring your own LLM, you pay only for sandbox runtime, not Novita model usage.
Open the returned **Web UI URL** and go to the `Chat` tab to start using your agent.
### Web Terminal
The Web Terminal provides browser-based terminal access to your sandbox environment. Open the **Web Terminal URL** returned by the launch command and log in with the provided credentials. This gives you a full shell session — install packages, inspect logs, or debug your agent directly.
### File Manager
The File Manager lets you browse, upload, download, and manage files in the sandbox workspace through a web interface. Open the **File Manager URL** and log in with the same credentials. Use it to view agent workspace files, edit configurations, or transfer files without needing CLI access.
For existing sandboxes launched before these services were available, you can add them retroactively:
```bash Bash icon="terminal" theme={"system"}
novitaclaw services setup --api-key YOUR_API_KEY
```
## Configuring Models
Your instance is pre-configured with a Novita-hosted model out of the box. To change the models your agent uses, navigate to `Settings → Config`, click **Raw** to switch to Raw JSON5 view, then click the reveal button next to "secrets redacted" to show the full config.
Update the following two sections:
### Step 1: Register the model under your provider
Add a new object to the `models` array inside `models.providers.novita`:
```json theme={"system"}
{
"models": {
"providers": {
"novita": {
"models": [
{
"id": "model-id",
"name": "display name",
"reasoning": true,
"input": ["text"],
"contextWindow": 200000,
"maxTokens": 50000
}
]
}
}
}
}
```
### Step 2: Set it as primary or fallback
Update the `model` field under `agents.defaults` to reference your model using the `provider/model-id` format:
```json theme={"system"}
{
"agents": {
"defaults": {
"model": {
"primary": "novita/model-id",
"fallbacks": ["novita/fallback-model-id"]
}
}
}
}
```
Click **Update** to save. Every LLM available on the [Novita platform](https://novita.ai/model-api/product/llm-api) is supported. Third-party providers can also be configured — when you bring your own LLM, you pay only for sandbox runtime, not Novita model usage.
 ## Connecting Channels
OpenClaw supports external messaging channels so your agent is reachable outside the Web UI. Channels are disabled by default and must be configured.
### Telegram
Connect your agent to Telegram as a messaging channel. Two connection modes are supported: **Polling** (default, long-poll — no public URL needed) and **Webhook** (HTTP push — best for on-demand sandboxes).
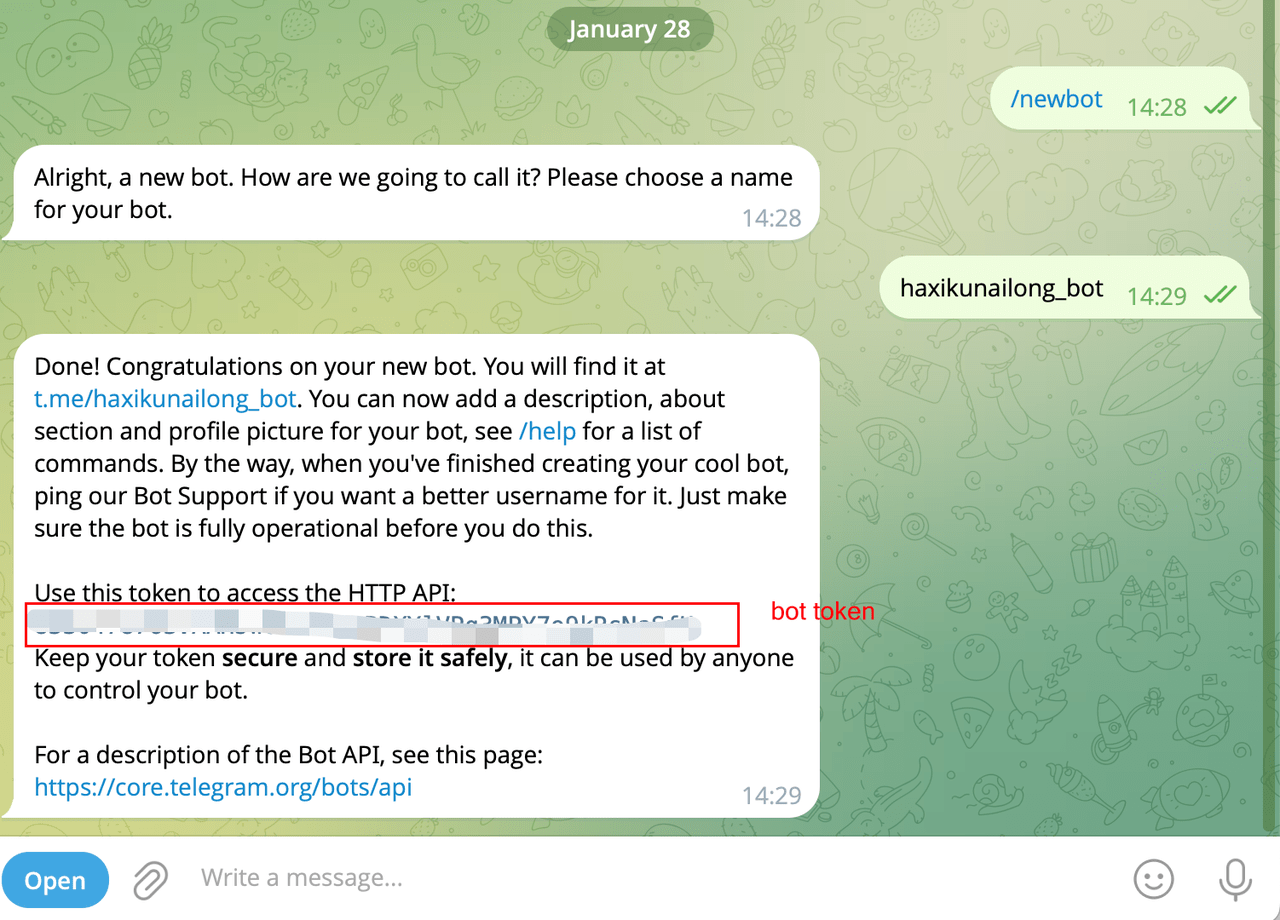
**Step 1: Create a Telegram Bot**
1. Open Telegram and find [@BotFather](https://t.me/BotFather).
2. Send `/newbot` and follow the prompts to name your bot.
3. Copy the bot token BotFather provides.
**Step 2: Configure via CLI**
```bash Bash icon="terminal" theme={"system"}
# Polling mode (simplest)
novitaclaw pair telegram \
--bot-token
# Webhook mode (supports on-demand auto-resume)
novitaclaw pair telegram \
--bot-token \
--mode webhook \
--webhook-url https://example.com/webhook/telegram \
--webhook-secret
```
**Step 3: Pair your bot**
In Telegram, open the bot you created and send `/start`. The bot replies with a pairing code. Approve it via CLI:
```bash Bash icon="terminal" theme={"system"}
novitaclaw pair list --channel telegram
novitaclaw pair approve --channel telegram --code
## Connecting Channels
OpenClaw supports external messaging channels so your agent is reachable outside the Web UI. Channels are disabled by default and must be configured.
### Telegram
Connect your agent to Telegram as a messaging channel. Two connection modes are supported: **Polling** (default, long-poll — no public URL needed) and **Webhook** (HTTP push — best for on-demand sandboxes).
**Step 1: Create a Telegram Bot**
1. Open Telegram and find [@BotFather](https://t.me/BotFather).
2. Send `/newbot` and follow the prompts to name your bot.
3. Copy the bot token BotFather provides.
**Step 2: Configure via CLI**
```bash Bash icon="terminal" theme={"system"}
# Polling mode (simplest)
novitaclaw pair telegram \
--bot-token
# Webhook mode (supports on-demand auto-resume)
novitaclaw pair telegram \
--bot-token \
--mode webhook \
--webhook-url https://example.com/webhook/telegram \
--webhook-secret
```
**Step 3: Pair your bot**
In Telegram, open the bot you created and send `/start`. The bot replies with a pairing code. Approve it via CLI:
```bash Bash icon="terminal" theme={"system"}
novitaclaw pair list --channel telegram
novitaclaw pair approve --channel telegram --code
```

Once connected, messages sent to your Telegram bot are routed directly to your OpenClaw agent.

### Slack

Connect your agent to Slack as a messaging channel. Two connection modes are supported: **Socket** (default, WebSocket — no public URL needed) and **HTTP** (Events API webhook — best for on-demand sandboxes).

```bash Bash icon="terminal" theme={"system"}
# Socket mode (simplest)
novitaclaw pair slack  \
  --bot-token xoxb-... \
  --app-token xapp-...

# HTTP mode (supports on-demand auto-resume)
novitaclaw pair slack  \
  --bot-token xoxb-... \
  --mode http \
  --signing-secret
```

On first conversation, the bot replies with a pairing code. Approve via CLI:

```bash Bash icon="terminal" theme={"system"}
novitaclaw pair list  --channel slack
novitaclaw pair approve  --channel slack --code
```

More channel integrations are supported — see the [Configuration guide](/guides/novitaclaw-configuration#connecting-channels) for detailed setup instructions for all channels including Feishu.

## Service Reliability

All core services in the sandbox are managed by systemd for production-grade reliability:

| Service                     | Description                        | Auto-Restart |
| --------------------------- | ---------------------------------- | ------------ |
| OpenClaw Gateway            | Agent runtime and WebSocket server | ✅            |
| Web Terminal (ttyd)         | Browser-based terminal access      | ✅            |
| File Manager (gohttpserver) | Web-based file management          | ✅            |

**Crash auto-recovery:** If the Gateway crashes repeatedly, the system automatically runs diagnostics, attempts repair, and restores the last known-good configuration from backup — no manual intervention required.

**Config auto-backup:** Every configuration write creates an automatic backup. If a bad config causes a crash, the recovery process restores from the most recent valid backup.

## Command Reference

### `launch`

Create a new sandbox instance.

```bash Bash icon="terminal" theme={"system"}
novitaclaw launch [OPTIONS]
```

| Option            | Description                                                |
| ----------------- | ---------------------------------------------------------- |
| `--api-key`       | Novita API key                                             |
| `--gateway-token` | Custom gateway token (optional, auto-generated by default) |
| `--timeout`       | Creation timeout in seconds (default: `60`)                |

### `list`

List active sandbox instances.

```bash Bash icon="terminal" theme={"system"}
novitaclaw list --api-key YOUR_API_KEY
```

| Option          | Description                                                 |
| --------------- | ----------------------------------------------------------- |
| `--api-key`     | Novita API key                                              |
| `--quiet`, `-q` | Only print sandbox IDs, one per line (useful for scripting) |

### `status`

Check a sandbox instance status. Displays webhook URLs for all configured channels.

```bash Bash icon="terminal" theme={"system"}
novitaclaw status  --api-key YOUR_API_KEY
```

| Option      | Description                                                |
| ----------- | ---------------------------------------------------------- |
| `--api-key` | Novita API key                                             |
| `--json`    | Output in JSON format (useful for extracting webhook URLs) |

### `stop`

Terminate a sandbox instance.

```bash Bash icon="terminal" theme={"system"}
novitaclaw stop  --api-key YOUR_API_KEY
```

| Option        | Description              |
| ------------- | ------------------------ |
| `--api-key`   | Novita API key           |
| `--yes`, `-y` | Skip confirmation prompt |

### `tui`

Connect to a sandbox via terminal UI.

```bash Bash icon="terminal" theme={"system"}
novitaclaw tui  --token
```

### `doctor`

Run diagnostics and repair checks on a sandbox instance.

```bash Bash icon="terminal" theme={"system"}
novitaclaw doctor  --api-key YOUR_API_KEY
```

| Option                       | Description                                                 |
| ---------------------------- | ----------------------------------------------------------- |
| `--api-key`                  | Novita API key                                              |
| `--deep`                     | Scan system services for extra gateway installs             |
| `--fix`                      | Apply recommended repairs (alias for `--repair`)            |
| `--force`                    | Apply aggressive repairs (overwrites custom service config) |
| `--generate-gateway-token`   | Generate and configure a gateway token                      |
| `--no-workspace-suggestions` | Disable workspace memory system suggestions                 |
| `--repair`                   | Apply recommended repairs without prompting                 |
| `--yes`                      | Accept defaults without prompting                           |

### `gateway update`

Update OpenClaw to the latest version inside a sandbox.

```bash Bash icon="terminal" theme={"system"}
novitaclaw gateway update  --api-key YOUR_API_KEY
```

| Option      | Description                  |
| ----------- | ---------------------------- |
| `--api-key` | Novita API key               |
| `--restart` | Restart gateway after update |

### `gateway restart`

Restart the OpenClaw Gateway in a sandbox.

```bash Bash icon="terminal" theme={"system"}
novitaclaw gateway restart  --api-key YOUR_API_KEY
```

### `services setup`

Install and start Web Terminal and File Manager on an existing sandbox. Use this to add services to older sandboxes that were launched before these services were included.

```bash Bash icon="terminal" theme={"system"}
novitaclaw services setup  --api-key YOUR_API_KEY
```

### `pair list`

List pending pairing requests for a channel.

```bash Bash icon="terminal" theme={"system"}
novitaclaw pair list  --channel  --api-key YOUR_API_KEY
```

### `pair approve`

Approve a pairing request for a channel.

```bash Bash icon="terminal" theme={"system"}
novitaclaw pair approve  --channel  --code  --api-key YOUR_API_KEY
```

### `pair telegram`

Configure Telegram as a messaging channel.

```bash Bash icon="terminal" theme={"system"}
novitaclaw pair telegram  --bot-token
```

| Option             | Description                                     |
| ------------------ | ----------------------------------------------- |
| `--bot-token`      | Telegram bot token from BotFather               |
| `--mode`           | `polling` (default) or `webhook`                |
| `--webhook-url`    | Public webhook URL (webhook mode only)          |
| `--webhook-secret` | Webhook secret (webhook mode only)              |
| `--webhook-host`   | Webhook bind address (default: `0.0.0.0`)       |
| `--webhook-port`   | Webhook listen port (default: `8787`)           |
| `--webhook-path`   | Webhook URL path (default: `/webhook/telegram`) |
| `--dm-policy`      | DM policy (default: `pairing`)                  |

### `pair slack`

Configure Slack as a messaging channel.

```bash Bash icon="terminal" theme={"system"}
novitaclaw pair slack  --bot-token xoxb-... --app-token xapp-...
```

| Option             | Description                                    |
| ------------------ | ---------------------------------------------- |
| `--bot-token`      | Slack bot token (`xoxb-...`)                   |
| `--app-token`      | Slack app token (`xapp-...`, socket mode only) |
| `--mode`           | `socket` (default) or `http`                   |
| `--signing-secret` | Slack signing secret (HTTP mode only)          |
| `--webhook-host`   | Webhook bind address (default: `0.0.0.0`)      |
| `--webhook-port`   | Webhook listen port (default: `8788`)          |
| `--webhook-path`   | Webhook URL path (default: `/webhook/slack`)   |

### `update`

Check for CLI updates and upgrade to the latest version.

```bash Bash icon="terminal" theme={"system"}
novitaclaw update
```

## Programmatic Usage

Use JSON output for automation:

```bash Bash icon="terminal" theme={"system"}
novitaclaw -j launch --api-key YOUR_API_KEY
```

Example response:

```json theme={"system"}
{
  "success": true,
  "data": {
    "sandbox_id": "xxx",
    "webui": "https://xxx.sandbox.novita.ai?token=xxx",
    "gateway_ws": "wss://xxx.sandbox.novita.ai",
    "gateway_token": "xxx",
    "terminal_url": "https://7681-xxx.sandbox.novita.ai",
    "filemanager_url": "https://7682-xxx.sandbox.novita.ai",
    "services_username": "admin",
    "services_password": "xxx"
  }
}
```

## Environment Variables

| Variable                 | Description                                       |
| ------------------------ | ------------------------------------------------- |
| `NOVITA_API_KEY`         | API key, eliminates the need for `--api-key` flag |
| `OPENCLAW_GATEWAY_TOKEN` | Preset gateway token                              |

## Pricing

| What you use       | What you pay                                         |
| ------------------ | ---------------------------------------------------- |
| Sandbox runtime    | [Sandbox rates](https://novita.ai/pricing?sandbox=1) |
| Novita-hosted LLMs | [Model rates](https://novita.ai/pricing)             |
| Third-party LLMs   | Sandbox runtime only                                 |

## Troubleshooting

### Command not found

Try one of these:

```bash Bash icon="terminal" theme={"system"}
# Use full path (Linux)
~/.local/bin/novitaclaw launch

# Typical macOS user path
~/Library/Python/3.x/bin/novitaclaw launch
```

### Connection timeout

Increase launch timeout:

```bash Bash icon="terminal" theme={"system"}
novitaclaw launch --timeout 180 --api-key YOUR_API_KEY
```

## Frequently Asked Questions

| Problem                                | Why it happens                                       | What to do                                                                  |
| -------------------------------------- | ---------------------------------------------------- | --------------------------------------------------------------------------- |
| "Command not found" / "Not recognized" | Python PATH not configured during install            | Reinstall Python and check "Add to PATH", or add the bin directory manually |
| "Permission Denied"                    | Insufficient permissions                             | Windows: Run Terminal as Administrator. Mac/Linux: prefix with `sudo`       |
| "Invalid API Key"                      | Key copied incorrectly                               | Check for extra spaces around the `sk_` string, or generate a new key       |
| Sandbox won't stop                     | Requires confirmation to prevent accidental deletion | Type `y` when prompted, or use `--yes` to skip confirmation                 |
| Mac: `pip` command not found           | macOS uses `pip3` by default                         | Use `pip3 install novitaclaw` instead of `pip`                              |