> ## Documentation Index
> Fetch the complete documentation index at: https://docs.novita.ai/llms.txt
> Use this file to discover all available pages before exploring further.
# Configuration
Configure models, connect external messaging channels, set up on-demand mode, and understand the service reliability features of your NovitaClaw instance.
## On-Demand Mode
On-demand mode automatically pauses your sandbox after a configurable idle period and resumes it on access. Ideal for low-traffic AI assistants, webhook-based IM integrations, and scheduled tasks. Zero billing while paused.
### Launching an On-Demand Sandbox
```bash CLI icon="terminal" theme={"system"}
# Default idle timeout: 300 seconds
novitaclaw launch --type on-demand
# Custom idle timeout (60–86400 seconds)
novitaclaw launch --type on-demand --idle-timeout 600
```
On-demand mode cannot be combined with `--mode node`.
### Manual Pause and Resume
```bash CLI icon="terminal" theme={"system"}
# Pause a sandbox (zero billing while paused)
novitaclaw pause
# Resume a sandbox (~1s to restore to pre-pause state)
novitaclaw resume
```
### Runtime Configuration
```bash CLI icon="terminal" theme={"system"}
# Update idle timeout (60–86400 seconds)
novitaclaw config set idle-timeout 600
# Update sandbox lifetime timeout (300–2592000 seconds)
novitaclaw config set timeout 3600
```
Changes take effect immediately. The in-sandbox agent picks up the new configuration on its next check cycle.
### How It Works
* Idle detection — An agent daemon inside the sandbox periodically checks OpenClaw session activity and writes status to `/tmp/.novitaclaw-status.json`.
* Auto-pause — The server-side idle monitor reads the agent status. After 2 consecutive idle checks, the sandbox is automatically paused.
* Auto-resume — Incoming webhook requests or Web UI access automatically resume a paused sandbox.
* Cron pre-wakeup — The scheduler scans paused sandboxes for upcoming cron schedules and resumes them \~120 seconds before the next job fires, ensuring cron jobs run on time.
### Checking Status
```bash CLI icon="terminal" theme={"system"}
# View sandbox status (does not trigger resume when paused)
novitaclaw status
# List shows sandbox_type and state columns
novitaclaw list
```
While paused, the `status` command still returns full URL information (read from the database without connecting to the sandbox), so scripts can store addresses without triggering a resume.
## Configuring Models
Your instance is pre-configured with a Novita-hosted model out of the box. To change the models your agent uses, navigate to `Settings → Config`, click Raw to switch to Raw JSON5 view, then click the reveal button next to "secrets redacted" to show the full config.
Update the following two sections:
### Step 1: Register the model under your provider
Add a new object to the `models` array inside `models.providers.novita`:
```json JSON icon="code" theme={"system"}
{
"models": {
"providers": {
"novita": {
"models": [
{
"id": "model-id",
"name": "display name",
"reasoning": true,
"input": ["text"],
"contextWindow": 200000,
"maxTokens": 50000
}
]
}
}
}
}
```
### Step 2: Set it as primary or fallback
Update the `model` field under `agents.defaults` to reference your model using the `provider/model-id` format:
```json JSON icon="code" theme={"system"}
{
"agents": {
"defaults": {
"model": {
"primary": "novita/model-id",
"fallbacks": ["novita/fallback-model-id"]
}
}
}
}
```
Click Update to save. Every LLM available on the [Novita platform](https://novita.ai/model-api/product/llm-api) is supported. Third-party providers can also be configured — when you bring your own LLM, you pay only for sandbox runtime, not Novita model usage.
 ## Connecting Channels
OpenClaw supports external messaging channels so your agent is reachable outside the Web UI. Channels are disabled by default and must be configured.
### Telegram
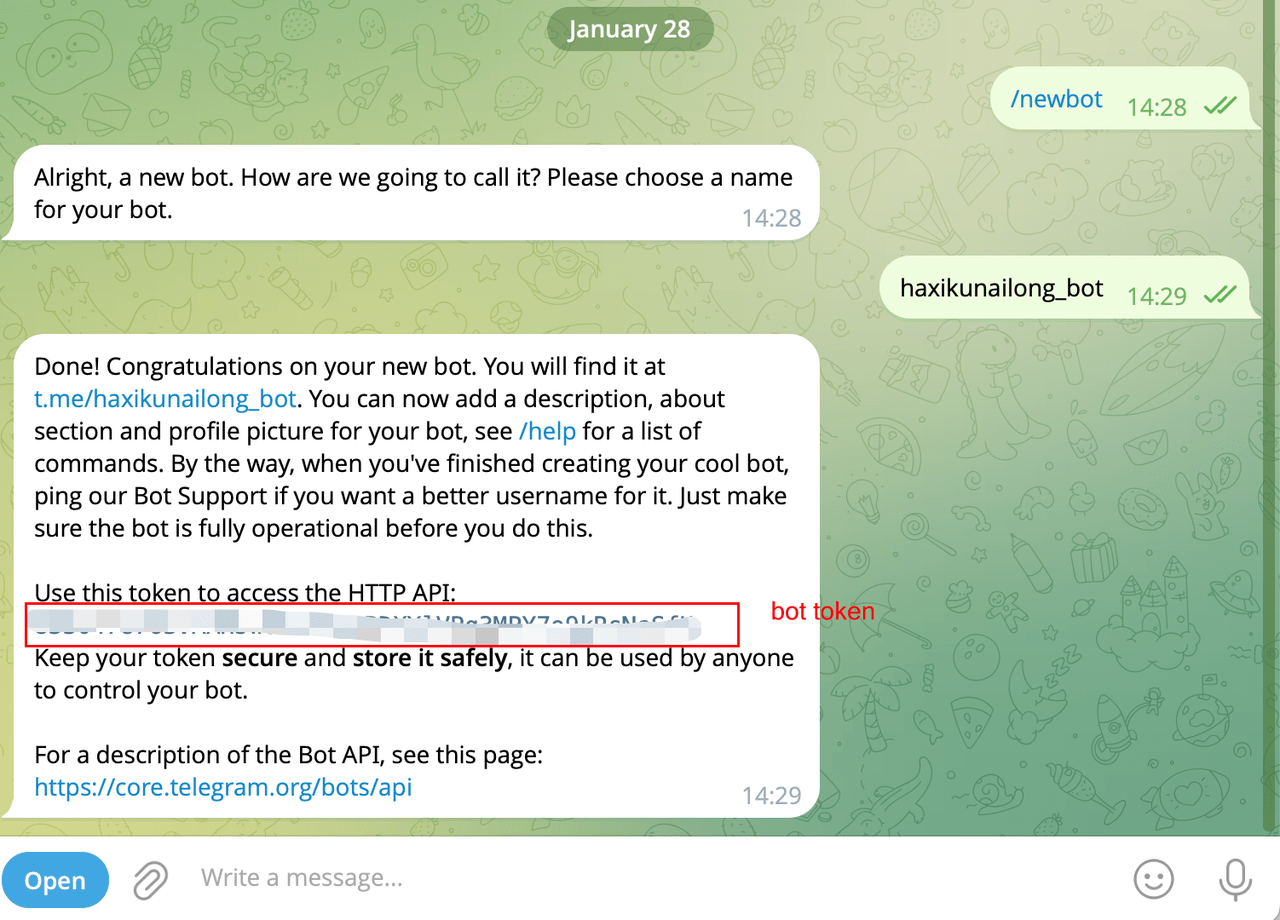
Connect your agent to Telegram as a messaging channel. Two connection modes are supported: Polling (default, long-poll — no public URL needed) and Webhook (HTTP push — best for on-demand sandboxes).
**Step 1: Create a Telegram Bot**
* Open Telegram and find [@BotFather](https://t.me/BotFather).
* Send `/newbot` and follow the prompts to name your bot.
* Copy the bot token BotFather provides.
#### Mode 1: Polling
Polling mode uses long-poll connections. No public URL required — simplest to configure.
Polling mode is not recommended for on-demand sandboxes. When the sandbox auto-pauses, the connection drops and incoming messages are lost. Use Webhook mode for on-demand sandboxes.
```bash CLI icon="terminal" theme={"system"}
novitaclaw pair telegram \
--bot-token
```
#### Mode 2: Webhook
Webhook mode requires the sandbox to expose an HTTP port for receiving Telegram push events. Best suited for on-demand sandboxes — incoming webhook requests automatically trigger resume.
The `--webhook-url` is the public URL assigned to your sandbox. Run the following command to retrieve it:
```bash CLI icon="terminal" theme={"system"}
novitaclaw status --json | jq -r '.telegram_webhook_url'
```
```bash CLI icon="terminal" theme={"system"}
novitaclaw pair telegram \
--bot-token \
--mode webhook \
--webhook-url \
--webhook-secret
```
#### Optional Webhook Parameters
| Parameter | Default | Description |
| ---------------- | ------------------- | --------------------------- |
| `--webhook-host` | `0.0.0.0` | Webhook server bind address |
| `--webhook-port` | `8787` | Webhook listen port |
| `--webhook-path` | `/webhook/telegram` | Webhook URL path |
| `--dm-policy` | `pairing` | DM policy |
#### Pairing Flow
On first conversation, the bot replies with a pairing code:
```bash CLI icon="terminal" theme={"system"}
# List pending pairing requests
novitaclaw pair list --channel telegram
# Approve a pairing request
novitaclaw pair approve --channel telegram --code
```
#### Mode Comparison
| | Polling | Webhook |
| --------------------- | ----------------------------------------- | ----------------------------------- |
| Connection | Outbound (long-poll) | Inbound (HTTP push) |
| Public port | Not required | Required |
| Setup complexity | Low | Medium (additional secrets) |
| On-demand auto-resume | Not supported (connection drops on pause) | Supported (webhook triggers resume) |
| Recommended for | Always-on sandboxes, development | On-demand sandboxes, production IM |
### Slack
Connect your agent to Slack as a messaging channel. Two connection modes are supported: Socket (default, WebSocket — no public URL needed) and HTTP (Events API webhook — best for on-demand sandboxes).
#### Mode 1: Socket
Socket mode uses a WebSocket connection. No public URL required — simplest to configure.
Socket mode is not recommended for on-demand sandboxes. When the sandbox auto-pauses, the WebSocket connection drops and incoming messages are lost. Use HTTP mode for on-demand sandboxes.
```bash CLI icon="terminal" theme={"system"}
novitaclaw pair slack \
--bot-token xoxb-... \
--app-token xapp-...
```
#### Mode 2: HTTP
HTTP mode uses Slack Events API webhooks. Best suited for on-demand sandboxes — incoming webhook requests automatically trigger resume.
```bash CLI icon="terminal" theme={"system"}
novitaclaw pair slack \
--bot-token xoxb-... \
--mode http \
--signing-secret
```
#### Optional HTTP Parameters
| Parameter | Default | Description |
| ---------------- | ---------------- | --------------------------- |
| `--webhook-host` | `0.0.0.0` | Webhook server bind address |
| `--webhook-port` | `8788` | Webhook listen port |
| `--webhook-path` | `/webhook/slack` | Webhook URL path |
#### Pairing Flow
On first conversation, the bot replies with a pairing code:
```bash CLI icon="terminal" theme={"system"}
# List pending pairing requests
novitaclaw pair list --channel slack
# Approve a pairing request
novitaclaw pair approve --channel slack --code
```
#### Mode Comparison
| | Socket | HTTP |
| --------------------- | ----------------------------------------- | ----------------------------------- |
| Connection | WebSocket (outbound) | HTTP push (inbound) |
| Public port | Not required | Required |
| Setup complexity | Low | Medium (additional secrets) |
| On-demand auto-resume | Not supported (connection drops on pause) | Supported (webhook triggers resume) |
| Recommended for | Always-on sandboxes, development | On-demand sandboxes, production IM |
### Channel Status
`novitaclaw status` displays webhook URLs for all configured channels:
```bash CLI icon="terminal" theme={"system"}
novitaclaw status
# Shows: Feishu Webhook, Telegram Webhook, Slack Webhook (when configured)
# JSON mode
novitaclaw status --json | jq -r '.feishu_webhook_url'
novitaclaw status --json | jq -r '.telegram_webhook_url'
novitaclaw status --json | jq -r '.slack_webhook_url'
```
### Feishu
Connect your agent to Feishu (Lark) as a messaging channel. Two connection modes are supported: Webhook (HTTP push) and Event (WebSocket long-poll).
#### Prerequisites: Create a Feishu App
* Open the [Feishu Open Platform](https://open.feishu.cn/app), log in and click Create Custom App.
* On the Credentials & Basic Info page, copy: App ID (format: `cli_xxx`) and App Secret.
* Go to Permission Management, click Batch Import, and paste the following permissions:
```json JSON icon="code" theme={"system"}
{
"scopes": {
"tenant": [
"im:message", "im:message:send_as_bot", "im:message:readonly",
"im:message.p2p_msg:readonly", "im:message.group_at_msg:readonly",
"im:resource", "im:chat.access_event.bot_p2p_chat:read",
"im:chat.members:bot_access"
],
"user": ["im:chat.access_event.bot_p2p_chat:read"]
}
}
```
* Go to App Capabilities > Bot and enable bot capability.
* Create a version and publish the app.
#### Mode 1: Webhook
Webhook mode requires the sandbox to expose an HTTP port for receiving Feishu push events. Best suited for on-demand sandboxes — incoming webhook requests automatically trigger resume.
Additional credentials: On the Feishu Open Platform, go to Development Configuration > Events & Callbacks > Encryption Strategy and copy: Verification Token and Encrypt Key.
```bash CLI icon="terminal" theme={"system"}
novitaclaw pair feishu \
--app-id cli_xxx \
--app-secret secret_xxx \
--mode webhook \
--verification-token tok_xxx \
--encrypt-key key_xxx
```
On the Feishu Open Platform Event Subscription page:
* Select Request URL Configuration
* Enter the Webhook URL — get it via:
```bash CLI icon="terminal" theme={"system"}
novitaclaw status --json | jq -r '.feishu_webhook_url'
```
* Add event: `im.message.receive_v1`
#### Mode 2: Event
Event mode uses a Feishu WebSocket long-poll connection. No public URL required — simplest to configure.
Event mode is not recommended for on-demand sandboxes. When the sandbox auto-pauses, the WebSocket connection drops and incoming messages are lost. Use Webhook mode for on-demand sandboxes.
```bash CLI icon="terminal" theme={"system"}
novitaclaw pair feishu \
--app-id cli_xxx \
--app-secret secret_xxx
```
After configuration, on the Feishu Open Platform Event Subscription page:
* Select Use Long Connection to Receive Events
* Add event: `im.message.receive_v1`
Ensure the gateway is running (`novitaclaw status `) before saving, otherwise Feishu may fail to save the long connection configuration.
#### Optional Webhook Parameters
| Parameter | Default | Description |
| ---------------- | ---------------- | --------------------------- |
| `--webhook-host` | `0.0.0.0` | Webhook server bind address |
| `--webhook-port` | `3000` | Webhook listen port |
| `--webhook-path` | `/feishu/events` | Webhook URL path |
#### Pairing Flow
Feishu uses a `pairing` strategy by default. On first conversation, the bot replies with a pairing code that must be approved via CLI:
```bash CLI icon="terminal" theme={"system"}
# List pending pairing requests
novitaclaw pair list --channel feishu
# Approve a pairing request
novitaclaw pair approve --channel feishu --code
```
#### Mode Comparison
| | Event | Webhook |
| --------------------- | -------------------------------- | ----------------------------------- |
| Connection | WebSocket long-poll (outbound) | HTTP push (inbound) |
| Public port | Not required | Required (default 3000) |
| Setup complexity | Low (App ID + Secret only) | Medium (additional Token + Key) |
| On-demand auto-resume | Not supported | Supported (webhook triggers resume) |
| Recommended for | Always-on sandboxes, development | On-demand sandboxes, production IM |
## Service Reliability
All core services in the sandbox are managed by systemd for production-grade reliability:
| Service | Description | Auto-Restart |
| --------------------------- | ---------------------------------- | ------------ |
| OpenClaw Gateway | Agent runtime and WebSocket server | ✅ |
| Web Terminal (ttyd) | Browser-based terminal access | ✅ |
| File Manager (gohttpserver) | Web-based file management | ✅ |
Crash auto-recovery: If the Gateway crashes repeatedly, the system automatically runs diagnostics, attempts repair, and restores the last known-good configuration from backup — no manual intervention required.
Config auto-backup: Every configuration write creates an automatic backup. If a bad config causes a crash, the recovery process restores from the most recent valid backup.
## Connecting Channels
OpenClaw supports external messaging channels so your agent is reachable outside the Web UI. Channels are disabled by default and must be configured.
### Telegram
Connect your agent to Telegram as a messaging channel. Two connection modes are supported: Polling (default, long-poll — no public URL needed) and Webhook (HTTP push — best for on-demand sandboxes).
**Step 1: Create a Telegram Bot**
* Open Telegram and find [@BotFather](https://t.me/BotFather).
* Send `/newbot` and follow the prompts to name your bot.
* Copy the bot token BotFather provides.
#### Mode 1: Polling
Polling mode uses long-poll connections. No public URL required — simplest to configure.
Polling mode is not recommended for on-demand sandboxes. When the sandbox auto-pauses, the connection drops and incoming messages are lost. Use Webhook mode for on-demand sandboxes.
```bash CLI icon="terminal" theme={"system"}
novitaclaw pair telegram \
--bot-token
```
#### Mode 2: Webhook
Webhook mode requires the sandbox to expose an HTTP port for receiving Telegram push events. Best suited for on-demand sandboxes — incoming webhook requests automatically trigger resume.
The `--webhook-url` is the public URL assigned to your sandbox. Run the following command to retrieve it:
```bash CLI icon="terminal" theme={"system"}
novitaclaw status --json | jq -r '.telegram_webhook_url'
```
```bash CLI icon="terminal" theme={"system"}
novitaclaw pair telegram \
--bot-token \
--mode webhook \
--webhook-url \
--webhook-secret
```
#### Optional Webhook Parameters
| Parameter | Default | Description |
| ---------------- | ------------------- | --------------------------- |
| `--webhook-host` | `0.0.0.0` | Webhook server bind address |
| `--webhook-port` | `8787` | Webhook listen port |
| `--webhook-path` | `/webhook/telegram` | Webhook URL path |
| `--dm-policy` | `pairing` | DM policy |
#### Pairing Flow
On first conversation, the bot replies with a pairing code:
```bash CLI icon="terminal" theme={"system"}
# List pending pairing requests
novitaclaw pair list --channel telegram
# Approve a pairing request
novitaclaw pair approve --channel telegram --code
```
#### Mode Comparison
| | Polling | Webhook |
| --------------------- | ----------------------------------------- | ----------------------------------- |
| Connection | Outbound (long-poll) | Inbound (HTTP push) |
| Public port | Not required | Required |
| Setup complexity | Low | Medium (additional secrets) |
| On-demand auto-resume | Not supported (connection drops on pause) | Supported (webhook triggers resume) |
| Recommended for | Always-on sandboxes, development | On-demand sandboxes, production IM |
### Slack
Connect your agent to Slack as a messaging channel. Two connection modes are supported: Socket (default, WebSocket — no public URL needed) and HTTP (Events API webhook — best for on-demand sandboxes).
#### Mode 1: Socket
Socket mode uses a WebSocket connection. No public URL required — simplest to configure.
Socket mode is not recommended for on-demand sandboxes. When the sandbox auto-pauses, the WebSocket connection drops and incoming messages are lost. Use HTTP mode for on-demand sandboxes.
```bash CLI icon="terminal" theme={"system"}
novitaclaw pair slack \
--bot-token xoxb-... \
--app-token xapp-...
```
#### Mode 2: HTTP
HTTP mode uses Slack Events API webhooks. Best suited for on-demand sandboxes — incoming webhook requests automatically trigger resume.
```bash CLI icon="terminal" theme={"system"}
novitaclaw pair slack \
--bot-token xoxb-... \
--mode http \
--signing-secret
```
#### Optional HTTP Parameters
| Parameter | Default | Description |
| ---------------- | ---------------- | --------------------------- |
| `--webhook-host` | `0.0.0.0` | Webhook server bind address |
| `--webhook-port` | `8788` | Webhook listen port |
| `--webhook-path` | `/webhook/slack` | Webhook URL path |
#### Pairing Flow
On first conversation, the bot replies with a pairing code:
```bash CLI icon="terminal" theme={"system"}
# List pending pairing requests
novitaclaw pair list --channel slack
# Approve a pairing request
novitaclaw pair approve --channel slack --code
```
#### Mode Comparison
| | Socket | HTTP |
| --------------------- | ----------------------------------------- | ----------------------------------- |
| Connection | WebSocket (outbound) | HTTP push (inbound) |
| Public port | Not required | Required |
| Setup complexity | Low | Medium (additional secrets) |
| On-demand auto-resume | Not supported (connection drops on pause) | Supported (webhook triggers resume) |
| Recommended for | Always-on sandboxes, development | On-demand sandboxes, production IM |
### Channel Status
`novitaclaw status` displays webhook URLs for all configured channels:
```bash CLI icon="terminal" theme={"system"}
novitaclaw status
# Shows: Feishu Webhook, Telegram Webhook, Slack Webhook (when configured)
# JSON mode
novitaclaw status --json | jq -r '.feishu_webhook_url'
novitaclaw status --json | jq -r '.telegram_webhook_url'
novitaclaw status --json | jq -r '.slack_webhook_url'
```
### Feishu
Connect your agent to Feishu (Lark) as a messaging channel. Two connection modes are supported: Webhook (HTTP push) and Event (WebSocket long-poll).
#### Prerequisites: Create a Feishu App
* Open the [Feishu Open Platform](https://open.feishu.cn/app), log in and click Create Custom App.
* On the Credentials & Basic Info page, copy: App ID (format: `cli_xxx`) and App Secret.
* Go to Permission Management, click Batch Import, and paste the following permissions:
```json JSON icon="code" theme={"system"}
{
"scopes": {
"tenant": [
"im:message", "im:message:send_as_bot", "im:message:readonly",
"im:message.p2p_msg:readonly", "im:message.group_at_msg:readonly",
"im:resource", "im:chat.access_event.bot_p2p_chat:read",
"im:chat.members:bot_access"
],
"user": ["im:chat.access_event.bot_p2p_chat:read"]
}
}
```
* Go to App Capabilities > Bot and enable bot capability.
* Create a version and publish the app.
#### Mode 1: Webhook
Webhook mode requires the sandbox to expose an HTTP port for receiving Feishu push events. Best suited for on-demand sandboxes — incoming webhook requests automatically trigger resume.
Additional credentials: On the Feishu Open Platform, go to Development Configuration > Events & Callbacks > Encryption Strategy and copy: Verification Token and Encrypt Key.
```bash CLI icon="terminal" theme={"system"}
novitaclaw pair feishu \
--app-id cli_xxx \
--app-secret secret_xxx \
--mode webhook \
--verification-token tok_xxx \
--encrypt-key key_xxx
```
On the Feishu Open Platform Event Subscription page:
* Select Request URL Configuration
* Enter the Webhook URL — get it via:
```bash CLI icon="terminal" theme={"system"}
novitaclaw status --json | jq -r '.feishu_webhook_url'
```
* Add event: `im.message.receive_v1`
#### Mode 2: Event
Event mode uses a Feishu WebSocket long-poll connection. No public URL required — simplest to configure.
Event mode is not recommended for on-demand sandboxes. When the sandbox auto-pauses, the WebSocket connection drops and incoming messages are lost. Use Webhook mode for on-demand sandboxes.
```bash CLI icon="terminal" theme={"system"}
novitaclaw pair feishu \
--app-id cli_xxx \
--app-secret secret_xxx
```
After configuration, on the Feishu Open Platform Event Subscription page:
* Select Use Long Connection to Receive Events
* Add event: `im.message.receive_v1`
Ensure the gateway is running (`novitaclaw status `) before saving, otherwise Feishu may fail to save the long connection configuration.
#### Optional Webhook Parameters
| Parameter | Default | Description |
| ---------------- | ---------------- | --------------------------- |
| `--webhook-host` | `0.0.0.0` | Webhook server bind address |
| `--webhook-port` | `3000` | Webhook listen port |
| `--webhook-path` | `/feishu/events` | Webhook URL path |
#### Pairing Flow
Feishu uses a `pairing` strategy by default. On first conversation, the bot replies with a pairing code that must be approved via CLI:
```bash CLI icon="terminal" theme={"system"}
# List pending pairing requests
novitaclaw pair list --channel feishu
# Approve a pairing request
novitaclaw pair approve --channel feishu --code
```
#### Mode Comparison
| | Event | Webhook |
| --------------------- | -------------------------------- | ----------------------------------- |
| Connection | WebSocket long-poll (outbound) | HTTP push (inbound) |
| Public port | Not required | Required (default 3000) |
| Setup complexity | Low (App ID + Secret only) | Medium (additional Token + Key) |
| On-demand auto-resume | Not supported | Supported (webhook triggers resume) |
| Recommended for | Always-on sandboxes, development | On-demand sandboxes, production IM |
## Service Reliability
All core services in the sandbox are managed by systemd for production-grade reliability:
| Service | Description | Auto-Restart |
| --------------------------- | ---------------------------------- | ------------ |
| OpenClaw Gateway | Agent runtime and WebSocket server | ✅ |
| Web Terminal (ttyd) | Browser-based terminal access | ✅ |
| File Manager (gohttpserver) | Web-based file management | ✅ |
Crash auto-recovery: If the Gateway crashes repeatedly, the system automatically runs diagnostics, attempts repair, and restores the last known-good configuration from backup — no manual intervention required.
Config auto-backup: Every configuration write creates an automatic backup. If a bad config causes a crash, the recovery process restores from the most recent valid backup.